What is an APU2? It’s a pretty awesome 64-bit single-board computer from PC Engines. I have one here that I want to turn into a router, and figured it’d be a good process to turn into a tutorial.
The Fast Way
Want to see the completed project and build it yourself? Check out the
github repo and use
the bootable-iso branch. You should be able to run make in that
branch and get a completed ISO out at
output/images/rootfs.iso9660. This is a hybrid ISO, so you can write
it to either a CD (not all that useful) or a USB key (very useful!).
The Step-by-Step Way (Starting From Scratch)
I went through a lot of experimenting to get this process nailed
down. The bootable-iso repository linked to above has a series of
commits that are forked off of the 2017.02 tag that match up with
these steps.
Get a copy of the buildroot-2017.02 source.
You can either grab this as a
tarball or from
Github. If you’re going to
use git, make sure you’re starting from the 2017.02 tag, if you want
to be sure that the following steps work. Using something newer or
older? Let me know if it works!
Start with qemu_x86_64_defconfig.
This is a pre-made configuration that targets 64-bit x86 emulation in
qemu. If you want to see what’s in the file, it’s stored in
configs/qemu_x86_64_defconfig. We want to tell buildroot to use this
configuration:
1
| |
Do a build
To do a build with buildroot, you just run make. This takes will
take the configured settings, use them to download all of the
necessary sources, build them, and finally generate a kernel and root
filesystem for you.
1
| |
This is going to take a while. Maybe go make a coffee…
The build filesystem images go into output/images. Once the build is
done, we can check out what we’ve got:
1 2 | |
In the output, we’ve got a kernel and a root filesystem, but no ISO.
Configure buildroot to build an ISO
To change the types of filesystem images we want to build, we use the buildroot menu-based configuration.
1
| |
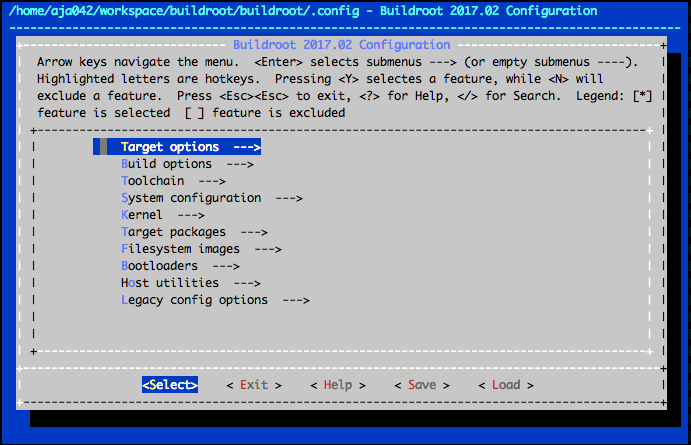
This pops up the top-level menu:

From here, we go into Bootloaders and enable ISOLINUX (this is one
of the options for a bootable-ISO-compatible bootloader, and probably
the simplest):

Next, we go back to the top-level menu and choose Filesystem images
and enable “ISO image”. While you’re here, make sure you’ve checked
off Build hybrid image; a “hybrid image” is an ISO that can also be
written to a USB key, which will be useful when we go to run code on
the APU2.

Exit the menu system and re-run make to re-build with the new
options. This should be way quicker than the first build, because it
will re-use as much of the previous work as it can.

1 2 3 4 | |
Hooray! We’ve got an ISO!
Run the built ISO in QEMU
QEMU is a pretty cool virtualization tool. It simulates an entire PC, it’s free, and it’s easy to use from the command-line. You could probably use VirtualBox, or VMware, or whatever else to do this step too. One of the great perks of QEMU is that it can emulate a text console to the target machine over SSH; handy, because I’m doing all of this work on a headless Linux box.
1 2 | |
Unfortunately, the default kernel settings provided with the
qemu_x86_64_defconfig use a QEMU-emulated video card, and no matter
how many different kernel command-line options I tried, I couldn’t
figure out how to turn this off.
This is all it shows:

If you’re running the curses version of QEMU and need to quit, you can
press Alt-2 or ESC 2 to switch to the QEMU monitor console and
type quit. If you go to the monitor console and want to go back to
the console, press Alt-1.

Disable the QEMU video drivers in the Linux kernel
Buildroot provides the menuconfig for configuring what buildroot is
going build, and it also provides linux-menuconfig for configuring
which options are going to be built into the Linux kernel. We’ll use
that to find the video drivers and disable them.
1
| |


In the Device Drivers, Graphics Drivers menu, you want to make
sure that QXL virtual GPU, DRM support for bochs..., and Virtio
GPU driver are all disabled.

Now, we’ll rebuild and try qemu again:
1 2 3 | |
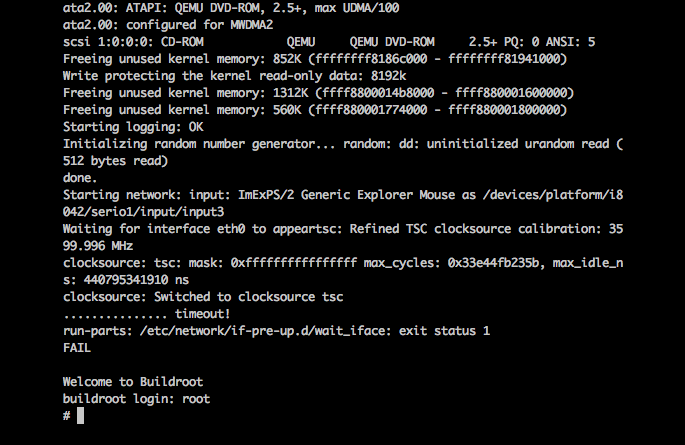
You can log in as root with no password now and poke around in our
super minimal Linux distribution:

When you’re ready to quit, press Alt-2 and type quit.
Saving our configuration
So far, we’ve modified both the buildroot configuration and the Linux kernel configuration. Let’s export those configurations so that we can get them back easily. First, we’ll change the name of the kernel configuration in the main buildroot menuconfig.
1 2 3 | |
Exit out of the menuconfig, and tell buildroot to save the current kernel config:
1
| |
This should create our apu2-linux-4.9.config for us:
1 2 | |
Now that the kernel config is there, we can save the main buildroot
configuration. Since this has already been configured early on, we
want to override the BR2_DEFCONFIG variable with make to save to a
new one:
1 2 3 4 | |
Now, we can do make apu2_x86_64_defconfig to configure our system
using our own configuration instead of the qemu_x86_64_defconfig we
started with.
Getting it to work on serial
Right now, we’ve got the system booting successfully and displaying everything on a text console. This is a good start, but the APU2 doesn’t have a display at all; it all just runs over the serial port.
In the command-line/curses version of QEMU, you can look at the serial
port by pressing Alt-3. If you do this on our existing image, you’ll
see that there isn’t anything interesting there yet.
There’s three things we need to configure for serial:
- The ISOLINUX bootloader
- The kernel console
- The kernel login prompt
The bootloader configuration lives in
fs/iso9660/isolinux.cfg. Looking at the
docs
tells us that we need to add a serial directive as the first line of
the configuration file. At the same time, we’ll add a console=
directive to the append line (which configures the kernel
command-line).
After editing, it should look like this:
1 2 3 4 5 6 7 | |
Next, we’ll tell Buildroot to use the serial port for a login
prompt. To change this setting, you run make menuconfig, and
navigate to System configuration, Run a getty (login prompt) after
boot, and change the TTY Port to ttyS0.
Now, rebuild your ISO and run QEMU:
1 2 3 | |
When you re-run QEMU, you will no longer get all of the kernel output on the main console; it should just show a bit of boot stuff:

If you press Alt-3, you will switch to the serial console and should see all of the kernel stuff you were expecting to see, along with a login prompt.

As usual, to quit QEMU, press Alt-2 and type quit.
The last step here is to save our modified buildroot configuration, so
that we don’t lose our changes to the default TTY. This time we don’t have to specify a BR2_DEFCONFIG, because we’ve already told it to use our apu2_x86_64_defconfig.
1
| |
Copying the ISO onto a USB Key
Following the instructions in the
Syslinux
documentation, we should be able to use dd to copy the ISO image
onto a USB key. In the command below, replace xxxxx with the path to
your USB key. MAKE SURE YOU DON’T SCREW THIS UP!. If you put the
wrong device here, you could overwrite the start of your hard drive
with this ISO instead, and that’s likely not what you want…
I like to use dmesg to check which drive I just plugged in to the machine:
1 2 3 4 5 6 7 8 9 10 11 12 | |
That looks like the one. So I’m going to replace xxxxx with sdb,
but you need to make sure you’ve got that right.
1 2 3 4 5 | |
Giving the APU2 boot a shot!
My USB-serial adapter showed up as /dev/ttyUSB0 when I plugged it
in. Yours might show up as /dev/ttyUSB[x] or /dev/ttyACM[x] or
something else entirely. Replace as needed in the minicom command.
Minicom is my preferred serial terminal emulator. Before powering on the APU2, get the serial cable all hooked up and get minicom started:
1
| |
Minicom should start up and have a blank window:

Plug the power in on the APU2 and watch stuff start to scroll by. When you get to the point where it’s asking which device to boot off of, choose the number that corresponds with your USB key:

And TADA! It’s booted!

Unfortunately, it doesn’t know anything about the Ethernet controllers on the APU2:

To quit minicom, press Ctrl-a z q and say yes to Leave without reset?
Rebuild the kernel with network driver support
We’re back to doing kernel configuration: make linux-menuconfig. In
here, we want to go to Device Drivers, Network device support,
Ethernet driver support, scroll down to Intel devices. The
APU2 spec page calls these NICs
“i210AT / i211AT”, but a bit of google searching reveals that these
are covered by the Intel(R) 82575/82576 PCI-Express Gigabit Ethernet
support driver. Enable that.
Now, rebuild your ISO and reflash your USB key. Once again, make sure you’re writing to the correct USB device!
1 2 3 4 5 6 | |
And try booting it again with minicom watching. Once it’s booted, verify that the NICs are detected:

Hooray! The last thing to do is to save the changed kernel config - we want to be able to reproduce this setup later!
1
| |
With that, I feel like this is a lot of content. There’ll be a part 2 coming soon where this gets configured as a router.